Wednesday, December 1, 2010

Patty Melt

The lowly Patty Melt, so simple yet so delicious. And I will add it is a fantastic remedy to "what am I gonna make for dinner when I don't want to cook?"

It started with the Sunday night, I'm hungry but not really in the cooking mood, don't want to go to the store or call for pizza, let's look in the fridge and see what happens. I found about 1/2 pound of ground chuck, some onions, mushrooms, swiss cheese and some of the whole grain Italian loaf bread I had cut up earlier to make stuffing for Thanksgiving. Now what?

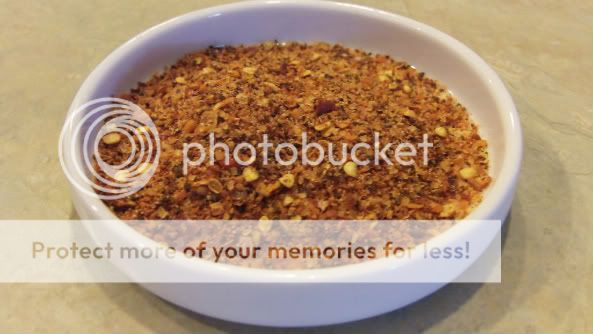
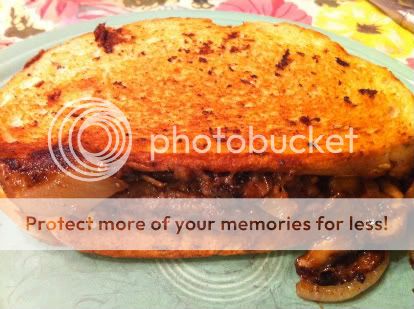
I pulled out the old griddle. I divided the ground chuck into 2 equal lumps and formed them to the oblong shape of the bread. Whatever kind of bread you have available is perfectly fine, it can be slightly stale as you are going to toast it. I seasoned the meat with salt and my spicy pepper mix (see earlier post) put them on the griddle on medium high heat and cooked them until they were medium well, then put them on a plate covered to keep warm. Then I sliced up the onions and mushrooms then sauteed them in about 1 TBLS each of olive oil and butter. You know you can NOT make a Patty Melt without butter! After the onions and mushrooms where soft, I thought they needed a little body, so I sprinkled on about 2 TBLS of flour and made a light roux. Then I poured about half a Bourbon Barrel beer into the mixture and let it thicken. Now you do not have to use beer, you could use broth of any kind or just water or you could just leave the onion and mushroom mixture alone and not thicken it, but if you use a beer then someone will have to drink what's left. When the onions and mushrooms were thickened I removed them from the griddle, wiped it down and got ready to assemble the Patty Melts.

Place a couple of slices of swiss cheese on one slice of bread, then place the beef patty on on top of the cheese and cover it with half of the mushroom/onion mixture. Smear some spicy brown mustard on the other piece of bread and place (mustard down) on top of the cheese. Repeat for the second sandwich. Melt 2 TBLS butter in the griddle on medium heat. Place the sandwiches on the griddle and place a weight on top, this makes your Patty Melt nice and flat and easy to eat. I used a plate and weighted it down with an iron skillet. Cook 2 - 4 minutes until golden brown, turn over and repeat for the other side. Now enjoy your masterpiece.

There are many variations and ways to embellish this simple sandwich. A lot depends on what's in your fridge. You know I'm always looking for ways to use up those little bits of leftovers. Ground turkey would be fine. You can use bell peppers and/or hot peppers if you have them. After I was finished I wished I had thrown some jalapenos in the mix. A chutney would be interesting as a topping. Leave out the mustard, add ketchup or both. Sun-dried tomatoes or a chopped chipotle in adobo would add a little kick. Chop some garlic. Any flavor cheese would be yum. If you have an electric Panini maker/griddle use it. The possibilities are endless

P.S. I did make a small mixed greens salad to go along with our Patty Melts, that made me feel better about the butter!

Monday, November 15, 2010

Leftovers?

It's a well known fact in these parts that "mamma doesn't cook on Friday night". What that does mean is she cooks Saturday - Thursday and by Thursday there are lots of bits of this and that which need to get used. So this past week I decided to make this from that.

Sure it's pizza, but it's deep dish pizza made from all the left over veggies and meats from the previous week's dinners. This is a perfect way to clean out the fridge. Ok, I admit it, I adore pizza and will look for any excuse to create one.

This started with a new trial crust (recipe will follow the post) which turned out to be pretty good. I also made this in my spring form pan so it was easy to serve. Here's the scoop. I made a simple sauce of 1/2 half an onion chopped, sauteed in 1 TBLSP butter and 1 TBLSP Olive oil for about 3 minutes, then added 2 minced garlic cloves. Then I added 1 28 oz. can of crushed tomatoes, salt and pepper to taste (a pinch of crushed red pepper too) and simmered for about 15 minutes. Then I pulled all the veggies out of my fridge. I had 4 shitake mushrooms, 5 baby bella mushrooms, a piece of green pepper, a piece of red bell pepper, a jalapeno and some more onion. I sliced all these veggies and sauteed them slightly in some olive oil. I found a bit of spicy Italian sausage and cooked that up and then I found 2 stray pieces of Hot Capocollo that I sliced. All the makings for perfect pizza. Of course I had some mozzerella cheese to grate and I found a couple of slices of provolone.

Next I rolled out the pizza dough, put it in my pan (I sprayed the pan with cooking spray and drizzled a bit of olive oil in the bottom first). I then put the pizza dough pan in the oven (425 degrees with the pizza stone) for 8 minutes. This made sure the crust would be crispy before the filling. In the bottom of the pan I put down the slices of provolone cheese and the mozzarella to cover. On top of this I layered my veggies and meat and then spread the sauce all over the top making sure to seal the edges. I didn't quite use all the sauce, but it really depends on how big your pan is. Then I sprinkled some fresh grated parmesan cheese and a little Italian Herb mix on the top and a little drizzle of olive oil. Put the whole thing back in the oven on top of the pizza stone for 20 minutes or until it's golden brown and bubbly. After you remove the pizza from the oven be sure to let it rest for at least 10 minutes before you try to serve or it will fall apart. Here's what I ended up with.

The best part was I used all the bits and pieces of leftover cooking. You can use anything that makes you happy. Whatever pizza flavors you like will work. Olives and artichokes are a great addition. Leave out the meat if you don't have any or don't want it. If you want a short cut you can open a jar of pasta sauce instead. The possibilities are endless. This is the perfect way to embellish your heart out.

Saturday, November 6, 2010

Happy Halloween!

So Halloween is over, but here's something to let you know we did have some fun! And they say you shouldn't play with your food!

Thursday, October 21, 2010

Comfort Food


When the weather starts to cool down my stomach starts to ask for hearty comfort food. And the perfect solution is Chicken Pot Pie.(And we're not talking about those frozen blocks you can buy in your grocer's freezer) This has always been a staple in our household. My kids could eat pot pie every meal. It also keeps well and makes great leftovers.


Chicken Pot Pie is one of those labors of love. It can be a little involved if you are stewing your own chicken, but it is so worth it. It's also easy to prepare the chicken and the filling the day before and then make your biscuits or pie crust and bake the next day after work. Trust me, your family will make you an instant hero when you serve this dish. And it's a good way to put some vegetables down some picky eaters. Who can resist all that great filling and biscuits?

The recipe for this delicious meal follows along with a recipe for easy baking powder biscuits. The pictures above show the Pot Pie made with a flaky butter pie crust, but 95% of the time I put biscuits on the top, that seems to be the favorite crust. While this might look like a lengthy process, I have include some alternate methods which make this a meal you could put on the table in a jiff. Enjoy all the smiles you'll receive.

Chicken Pot Pie
1 chicken stewed and the meat taken off the bone and torn into chunks(reserve the stock) see below
8 cups chicken stock
½ stick butter and ¼ cup olive oil
¾ cup all purpose flour
1 large onion chopped
3 -4 garlic cloves minced
4 carrots halved lengthwise and sliced in ¼ inch pieces
2 medium potatoes peeled and cut into 1 inch chunks
1 cup small dry pasta such as Ditalini
1 cup frozen lima beans
1 cup frozen corn
1 cup frozen peas
1 recipe pie crust or 1 recipe baking powder biscuits


In a large pot on the stove over medium heat, melt the butter with the olive oil. Add the onions and garlic to this and cook until the onions are wilted about 2 -3 minutes. Stir being careful the garlic does not burn. To this mixture add the flour and whisk together with the onions and garlic until smooth. Keep stirring for a minute or 2 so the flour with cook. Next add about 4 cups of chicken stock and whisk until smooth, add the remaining stock and let it all come to a slow simmer.
When the stock is bubbling slightly, add the carrots, potatoes and pasta. Bring to a boil then reduce the heat to medium and cook until the pasta is al dente and the potatoes are fork tender, approximately 10 minutes. Be sure to stir this mixture frequently as the pasta has a tendency to stick to the bottom of the pan. When the potatoes and pasta are finished add the lima beans, corn and peas and cook for 6-8 more minutes until they are heated through. If you think your mixture is too thick you can add more broth, but remember, it is a stew and the biscuits will soak up quite a bit of liquid. Remove the pan from the heat and add the chicken.
Pie Crust Version
Preheat the oven to 400 degrees. Coat a 9 X 13 pan with cooking spray. Roll out the bottom crust to be approximately the size of the pan, place it in the bottom. Don’t try to make it go up the sides, this is just to give a nice crunch bottom. Pour the chicken mixture on top of the bottom crust making sure to leave about ½ inch at the top (you may have extra filling, that’s ok, you can make a small potpie or you can freeze this for another time). Roll out the top crust a little larger than the pan opening and place on the top. I usually crimp the edges down inside the pan, that gives you a little extra crust on the sides. Coat the top of the potpie with egg wash. Place this pan on a baking sheet (this protects your oven in the event of spill overs) and bake for 20 – 30 minutes or until golden brown and bubbly. Let it cool for about 10 minutes before serving.
Baking Powder Biscuit Version
Preheat the oven to 425 degrees. Coat a 9 X 13 pan with cooking spray. Pour the chicken mixture into the pan leaving about 1 inch clearance to the top of the pan. Arrange the biscuits on top leaving about ¼ inch between them. It’s ok to have them close, they will just puff up and it’s good to have lots of biscuits when eating. If you like, you can brush a little melted butter on top of the biscuits before baking. Place the pan on a baking sheet (this protects your oven in the event of spill overs) and bake for 20 – 25 minutes until the biscuits are golden brown. Let it cool for about 10 minutes before serving.

Embellishasyouwish
Whatever goes. You can use any vegetables you like. I adore lima beans so I put them in everything, but you don’t’ have to. You could add a few fresh mushrooms when you add the potatoes. You can add fresh green beans, asparagus or broccoli. Just cut them in bite size pieces and add to the broth.
If you wanted to make this vegetarian, omit the chicken and substitute vegetable broth.
Here are some shortcuts. Instead of fresh carrots, use a bag of frozen peas and carrots, it works fine. You can also use a bag of frozen vegetables that includes corn, beans, and carrots. If you do not want to go to the trouble of stewing a chicken, buy a rotisserie chicken in the grocery, it works just fine. Then you just need to buy a couple of cartons of chicken broth to substitute for the stock. This is a great short cut and gets food on the table faster.
You can substitute canned biscuits for the topping. You could also substitute pie crust from the refrigerator case in the grocery store.>

Baking Powder Biscuits

2 cups All Purpose Flour
3 tsp baking powder
1 tsp salt
1/2 cup shortening
1 cup milk

In a medium mixing bowl, combine the flour, baking powder and salt. Cut in the shortening using a pastry blender or 2 knives. Add the milk and stir to mix. The mixture will be a little sticky, if not add a bit more milk, if it’s too sticky add a bit more flour.
Turn out on to a lightly floured surface. Pat the dough into a round about ½ inch thick. Cut using a biscuit cutter dipped in flour or you can use a small drinking glass to cut. Place on an ungreased sheet pan leaving a one inch space between the biscuits. Bake at 425 degrees for 12 – 15 minutes or until the tops are golden brown.

Note: You can substitute buttermilk for regular milk, it may take a bit more though. Sometimes I use half milk and half buttermilk, just depends on what I have on hand.>

Here's a biscuit version.

Monday, October 11, 2010

Sometimes Less is More

I love steamed vegetables. Broccoli is hands down the favorite in our household. Someone once asked me what kind of steamer I use for these veggies. I'm sure I had a puzzled look on my face because I had never really considered an "official steamer" as being part of my cooking equipment. I have always used a Pyrex mixing bowl and a plate. I bet you have a similar set up in your kitchen right now. All you need is a glass mixing bowl and a plate that fits snugly on the top.

Now this is not a fancy arrangement but it will turn out perfectly steamed microwaved vegetables every time. This was broccoli and I threw in some Baby Bella mushrooms. Layer the vegetables in the bowl, add some butter or olive oil, salt and pepper as desired, place the "lid" on the top and microwave for 3 minutes. Check for doneness and microwave in 30 sec. intervals until finished. No water needed, if the lid/plate is a tight fit steam will be created. Remember, when you take the bowl out of the microwave it will still keep cooking as long as the lid is on, and be careful when removing so you don't get burned by the steam.

It's magic, it's easy, it's healthy (but don't tell any one), it's quick and it's good. I think that about covers all the high points.

This works for any and all vegetables. You can totally omit the butter or olive oil if you are watching the fats, but a little sure does add to the flavor. I totally forgot to take a picture of the finished result, but I do have a picture of the broccoli on the plate with the rest of the meal. I'll leave you with this.

Wednesday, September 29, 2010

Life Began as a Roux

A Roux. Music to my ears. How can something so simple make what you are cooking so good? Technically a Roux is equal parts fat and flour. The fat can be butter, oil, animal fat or whatever. The classically trained will use butter and flour to thicken and flavor dishes. For today's purposes we are talking about a Cajun roux.

I was in the mood for some Gumbo and you have to start with a hearty roux. This was 1 cup of vegetable oil and 1 cup of all purpose flour. I stirred them over medium high heat for about 25 minutes until it turned the color of a dirty copper penny. Here's an interesting factoid, the darker the roux the less thickening power it has. In this case I am not looking for thickening, but want a deep, rich flavor for the background of the gumbo.

Now gumbo is probably the best example for embellishing. There are no rules, you just put in whatever you like. There are many different versions of gumbo, some using rabbit, squirrel, chicken, various seafoods and anything else you can think of. In this version I used some chicken thighs, about 6 dove breasts and some spicy andouille sausage.

Gumbo Ya-Ya

1 medium onion chopped
2 garlic cloves chopped
2 celery stalks chopped
1 large can diced tomatoes (I used 1 quart of tomatoes I canned last summer)
2 – 3 cups okra sliced in ½ inch rounds
2 chicken thighs, skin removed
1 chicken breast, skin removed (I left the bones in while this cooked then removed them before serving)
½ pound Andouille sausage sliced about ¼ inch thick
2 quarts of water
Crushed red pepper
2 Bay leaves
Salt and Pepper

Make a roux. In a large stockpot over medium high heat, mix 1 cup vegetable oil and 1 cup of flour. Using a whisk continue to stir until it is the color of a dirty copper penny, about 25 minutes. Be sure to stir constantly or it will burn, you may need to adjust the heat down a bit if it is bubbling too much.

When the roux is ready, add the onion, garlic and celery and cook until just soft, about 2 -3 minutes. Next add the tomatoes and the water. Bring this to a boil and add the meats. Season with salt and pepper and a good pinch of crushed red pepper. Add the bay leaves. Lower the heat so there is just a slight bubble to the mixture and let this cook for about 1 hour. After about an hour add the okra to the mixture and continue cooking until the meat falls off the bone and the gumbo has thickened. Remove the bones from the chicken and shred it into pieces. It will probably just fall apart on it’s own.

Serve with steamed white rice and File powder. Garnish with green onions. Make sure you have a good crusty bread for soppin’.

Embellishasyouwish
You can embellish your heart out here. This could be made with no meat, I would use a good vegetable stock instead of water. You can use shrimp and andouille sausage. If you use shrimp, add it in the last 20 minutes or so of cooking and I would also use half chicken or vegetable stock with the water. You can use any type of wild game. I threw in some dove breasts and they tasted just fine. The okra will thicken the gumbo, it can be omitted if it isn’t your favorite. Green peppers are a good addition too. The sky is the limit, just make sure you have a good roux as a base.

This is my version of Gumbo, there are a zillion different combinations, just use what makes you happy and enjoy.

Tuesday, September 21, 2010

Mussels

We are still having really HOT weather here in Kentucky. What's that got to do with food? Nothing really except I like to keep the heat out of the kitchen. One of my all time favorites are steamed mussels and a cold glass (or 3) of crisp Pinot Grigio.

You can find Blue Mussels at most larger groceries. I usually buy them at Whole Foods because they are very good about checking each one of them. This is an important note. When you are cleaning the mussels, run them under cold water and they should close, if you don't see any movement throw it away. After steaming, if any of them don't open throw it out. That is another good reason to buy seafood from someone who knows what they are doing.

Perfect Every Time Steamed Mussels

Serves 2 as a main dish, 4-6 as an appetizer

2 pounds Blue Mussels, beards removed and cleaned
1 medium onion finely chopped
1 12 oz. beer
12 oz. water
1 lemon quartered
Black Pepper

I use a my large pasta pan with the steamer insert, it makes this much easier. If you don’t have a steamer insert use a large stockpot. Place the cleaned mussels and onions in the steamer basket of your pan. Sprinkle these liberally with black pepper and set aside.

In the stockpot, put the beer, water, squeeze the juice from the lemon quarters (put the rinds in the basket with the mussels). Heat the liquid in the pan until boiling. When it comes to a boil put in the steamer basket with mussels and cover with a lid. Let the mussels steam until they open, about 5 to 8 minutes. It is best to shake the pan a couple of times while they are steaming to even out the cooking. The ones on the bottom cook faster. When they are finished, remove the steamer basket carefully, let it drain slightly then pour all the contents into a large serving bowl or platter. You want all the good pepper and onions to go with the mussels.

Now if you aren’t using a steamer basket, bring the liquids to a boil and then gently add the mussels to the mixture, cover with a lid and steam as above. When they are finished you can just pour them out into a mesh strainer to drain off the liquid.

Serve immediately with some melted butter and lemon wedges. ( I always like to put a little spicy creole mix in the butter.) Make sure you scoop up some onions with the mussels they are oh so sweet.

This makes a great summer time meal. Sit on the deck with a nice glass of wine, a loaf a crusty bread, your sweetheart and some great mussels.

Thursday, September 16, 2010

Into the Wild

I grew up thinking all the meat we ate just magically appeared in the grocery. Then I married the "Galley Slave" and soon learned to whistle a different tune. He grew up on a farm and spent his time hunting and fishing. Hmmm, will this work?

I quickly learned how to cook the game he brought home. Now our deal has always been that when the meat comes to me it looks just like it might have come from a store. In other words, it needs to be clean and neat. My initial endeavors were questionable, but were eaten with a smile. I eventually learned how to not overcook dishes and how to season with lots of tomatoes, peppers, onions and garlic.

As with most of us, work and family took away from hunting time. Now it is more of a 2 or 3 times a year. But we always look forward to Dove hunting at the first of September. This seems to be the first indication of Fall. We usually are able to freeze enough of those delectable Dove Breasts to enjoy through the winter.

Here is the first offering of the season. There are many ways to cook these delicious items. I like to bury them in wild rice with white wine and mushrooms and let them bake. But tonight the Galley Slave requested plain and simple, so here you have it.

I sprinkled a bit of salt and spicy pepper mix (see previous post) on each breast, wrapped it in a third of a slice of bacon and put them on skewers. I used 2 skewers as this gives you stability for turning on the grill. Actually this little secret came from the Galley Slave and it really works, try it with vegetable kabobs and you will be a convert. Then I grilled these skewers for about 20 minutes on medium low heat, turning a couple of times. You know they are done when the bacon is golden. The bacon really is necessary here as it helps keep the moisture in the meat, not to mention it tastes good too. I served these Dove Breasts with some baby squash sauteed in butter and olive oil along with onions, garlic and some cremini mushrooms. We also had roasted red potatoes and rosemary bread. A great meal to mark the beginning of Fall.

Friday, September 10, 2010

A Slow Week


I think this speaks for itself. The short week got away from me and I can't remember what I cooked. So here's a little chuckle for you from the Galley Slave who likes to play with his food. We'll be back next week.

Thursday, September 2, 2010

Odd Measurements


A couple of years ago I responded to an offer for free recipes that included a gift. When I received the gift I was a little perplexed. It was a set of measuring spoons labled. Dash, Pinch, Smidgen. Now what would I do with these? Doesn't everyone know how much is a dash? So off into a drawer with not another thought.

Fast forward. I had decided to take up "serious" bread baking and while reading my personal favorite bread book, "The Bread Bible", I learned the use for these measuring spoons. Rose Levy Beranbaum's book tackles bread from a scientific outlook where measurements are sacred. This is quite the opposite of my approach to baking where you look at a cup a flour and say, that looks like the right amount. I was surprised she referenced the use of these small measuring spoons. Of course I assumed I was smart enough to figure out how much is a dash, I've done it many times and I'm sure I am always right. Maybe not.

Okay, maybe I'll need to buy some of these soon. Then I had a flash and remembered the "free gift" I had received. This validates my theory that one should never throw out cooking gizmos.

So now armed with the proper tools I am able to bake. I won't kid you to say this made me an expert or even close to one. It is interesting how much more consistent my measurements have become. While this may not be the answer to world peace or why I can't find any lids that match storage containers, it is comforting to know I am accurate in my cooking.

Tuesday, August 31, 2010

Crumble, Crisp, Cobbler, Good

We are not dessert eaters in this household, but every now and then you just can't say no. I have no resistance when it comes to fresh fruit and the idea of adding ice cream just makes me quiver.


Enter the lowly Crumble. You see these wonderful fruit desserts which are given different names. The Crumble (which is also sometimes called a Crisp) is a topping made with flour, brown sugar, oats (or some other cereal grain) and sometimes nuts. It has a granola type texture and covers the entire top of the dish. A Cobbler has the fruit covered with a complete dough topping, resembling a pie without the bottom crust. A Slump is the fruit topped with biscuits and cooked on top of the stove usually in an iron skillet. They are all tasty, but I am partial to the ease and goodness of the Crumble. I also have convinced myself that a Crumble is healthy because you are using oats (just don't think about the butter or sugar).

I have had the best luck using blueberries for this dessert. I have also combined some peaches in here too. It's always good and it's always gone. This is a perfect dish to be served up with really good vanilla ice cream while you are sitting on the deck enjoying the end of summer. I think we might just do that this evening.

Blueberry Crumble
½ cup granulated sugar
4 teaspoons cornstarch
Pinch of salt
5 cups fresh blueberries rinsed and drained (this is about 2 pints)
2/3 cup all purpose flour
½ cup old fashioned oats (not the quick cooking kind)
1/3 cup packed light brown sugar
½ tsp cinnamon
6 tablespoons unsalted butter really cold and cut into 6 pieces

Preheat the oven to 375 degrees.

Combine the granulated sugar, cornstarch and salt in a large bowl. Add the berries to the bowl and toss gently to coat. I have found using a rubber spatula gets the job done without being too harsh on the fruit. Transfer this to a 8”X8” square baking pan that has been coated with cooking spray (trust me, you’ll be glad you did this).

Place the oats, brown sugar and cinnamon in a food processor and pulse 2 or 3 times to blend. Add the butter and pulse until you have clumps about the size of dimes. Alternately you could put the first ingredients in a bowl then cut the butter in with a pastry cutter. Whichever is easier for you. I usually use the pastry cutter method because I’m too lazy to clean the food processor. Sprinkle the crumble mixture over the top of the blueberries.

Bake until the filling is bubbling around the edges and the top is golden brown in color, approximately 30 minutes. Cool on a wire rack for at least 30 minutes before serving. Serve with ice cream or whipped cream.

Embellishasyouwish

You can add fresh peaches to this mixture. Substitute 2 peeled and sliced peaches for about 2 cups of the blueberries. In fact I used 1 pint of blueberries and 2 peaches and it was scrumptious. Or you could use all peaches and throw in a few raisins. I also added a pinch of nutmeg to the crumble topping. Another great addition would be nuts. Toasted almond slivers or pecans would add some more crunch.

Any firm fruit would make a good crumble, you would just need to adjust the sugar content based on which fruit you choose.

Thursday, August 26, 2010

A Good Pepper


Spicy Pepper Mix. Years ago I bought a spicy pepper mix in the grocery store and started to use it in most everything I cooked. Then I looked at the label and saw the salt content. It was about 60%! I decided an alternative was needed.

Now all the "celebrity chefs" have their signature seasonings and I've tried most of them. What I've come up with is really more of a pepper supstitute/mix. My version is not "herby" and is really just designed to give your every day cooking a little boost. If you use pepper and spices you never even realize you have cut your salt intake. Everyone wins.

I will confess that it is a bit easier if you start with a bottle of McCormick GrillMates Montreal Steak Seasoning This will be the salt and pepper part of the mixture. There are other steak seasonings available so feel free to use any that you like.

I use this mixture in everything I cook. I found a large (29 oz) bottle of the Montreal Steak at Costco and made a BIG batch to have on hand.

Spicy Pepper Mix

1 bottle of McCormick GrillMates Montreal Steak seasoning (available at most groceries in the spice aisle) This is approx ½ cup.
¼ cup black pepper
¼ cup garlic powder
2 TBLSP Paprika
1 TBLSP Smoky Paprika
1 TBLSP Cayenne Pepper
2 TBLSP Crushed Red Pepper flakes

Mix all the spices together and store in an airtight container. I usually put part of the mixture back in the steak seasoning shaker for convenience. Use as you would pepper and remember there is some salt in here so don’t add more to whatever you’re cooking until you taste it.

Friday, August 20, 2010

The Magical Black Bean


Black beans are full of everything good for you. They are endlessly adaptable and fun to cook with. Last winter I had some black beans and edamame (another favorite) and decided they would make a yum salad.

Then I discovered wheatberries. These little pieces of grain pack a big punch. They add great flavor and a little crunchy texture. Now we have the trifecta of fiber in our salad.

The recipe below is a pretty universal version. However you really don't have to follow it that closely. This salad has morphed into a "let's clean out the veggie drawer" salad. Tonight's version included, black beans, edamame, fresh tomatoes, a cubanelle and jalapeno pepper from the garden, red and white onion (because I had a little of both) and I put in just a splash of soy sauce. I didn't have any cilantro and I forgot to cook the wheatberries, but it turned out just fine. In fact the Galley Slave said this might be his favorite incarnation of the salad. I attribute it to the fact he was really hungry.

This bean salad is a perfect addition to any meal. It keeps well in the fridge for several days. It's great to take to a pitch in dinner. I've even thrown some leftover cooked chicken in and served the whole thing on some baby greens. This is a great way to embellish. Don't be afraid to mix it up. And if you think you don't like black beans I dare you to try this, it will make a believer out of you. When you serve this dish, just don' mention that it's "healthy".


Bean Salad


1 – 15 oz. can Black beans rinsed and drained
1 – cup shelled edamame beans
1 – cup red onion diced
1 – cup cucumber chopped
2/3 cup chopped roasted red pepper
1 small jalapeno or Serrano chile seeded and diced
1 – cup cherry tomatoes halved
½ cup wheat berries that have been cooked
1/3 cup chopped cilantro
3 TBLSP Red wine Vinegar
3 TBLSP Rice wine vinegar
3 TBLSP Extra Virgin Olive Oil
Salt and pepper

Bring ½ cup wheatberries and 2 quarts water to a boil, turn down the heat and simmer for about 50 minutes or until they are still slightly crunchy. Drain and rinse with cold water and let drain for a few minutes.

Combine the first 8 ingredients in a bowl and mix gently. Pour the vinegars and olive oil over the bean mixture and stir. Add black pepper and salt to taste.

Embellish As You Wish

You can do any number of embellishes here. Carrots are a great addition, I like to shred them and add in. If you can’t find wheatberries or don’t want them leave them out. If you don’t like cilantro just omit it. You can add some fresh squeezed lime juice for extra tang. If you don’t have a jalapeno you can always throw in a pinch of crushed red pepper or just leave it out. Sometimes a little Feta cheese added in is good.

Monday, August 16, 2010

Psst. . . can you keep a secret?

Have you ever been out all day and desperately try to think of something quick and semi nourishing you can pick up on the way home? I have the answer, Deli Pizza.

Stop laughing you won't be able to learn the rest of my secret. I have found that a simple Deli pizza (you know, the fresh ones that are wrapped in plastic that you take home and bake in the oven) from any grocery store can be an embellisher's delight. They come in a cheese blend version, meat varieties and some even have veggies and cost $5 - $7 each. I suggest staying away from the veggie ones as the so called vegetables can be a tad slimy.

Seriously folks, it makes a great dinner. Check this out.

Now mind you this version has been embellished. Just look in your fridge for whatever kinds of vegetables, meats or cheese you have available. I put some sliced portabello mushrooms, red onion, cubanelle pepper, hot capicola, shredded fontina and mozzarella cheeses (I had just a little piece of each) then topped the whole thing with thinly sliced fresh tomatoes and fresh basil. I also sprinkled some of my hot pepper mix on top of the tomatoes. On the exposed outer crust I brushed on a little bit of olive oil which made the whole thing gorgeously brown. Bake the pizza directly on the oven rack (be sure to take it off the cardboard, don't ask why I mention this) at 375 degrees for 20 minutes or so and you have a world famous pizza.

You can put everything and anything you like on here, whatever your heart desires or more importantly whatever you have on hand. Add a little green salad and it will look like you spent hours fixing dinner. One of these pizzas will feed four with no problem.

It's ok to start with something pre-made, you just have to make it your own. But don't tell anyone our little secret.

Thursday, August 12, 2010

Is it Wrong to Love a Pan?


Meet "Little Green", the object of my affection, the one item I would grab if the house were burning and I could only carry one thing. Ok, this might sound like one of the craziest things you've ever heard, but before you log out let me state my case.

Cooks need tools too. I'm not talking about a world-class professional kitchen, just something to make your life easier. My first set of cookware was a 12 piece (and that included lids) Teflon coated, almond colored mess that came from a hardware store and cost $20. It got the job done, but soon all the Teflon flaked out and everything stuck no matter what. Then about 15 years ago the Galley Slave bought my first LeCreuset pan. It was love at first sight. These are French enameled cast iron pans. They are available in a variety of beautiful colors and sizes. This particular one is 4 1/2 quart size.

Now you might ask what is it about this pan that will nearly make me swoon. You can cook anything in here and it cleans up. There is no non-stick, it just works like magic. This 4 1/2 quart size is just right for stewing a chicken, making pasta sauce, cooking dry beans, frying anything in oil (if we really do fry in oil, wink, wink). You can put a nice roast in the pan with potatoes and carrots and little red wine, put on the lid and throw it in the oven and a few hours later you have a tender, scrumptious meal. This pan allows you to embellish your heart out.

I have accumulated some larger versions of this pan (Big Green, Big Orange, Little Red) but this is the one that gets used several times a week. I dropped the lid once and the knob broke, I can't bring myself the replace the knob, it's like a badge of honor. So the moral of this story is, there are more cooking gizmos and gadgets out there than you can even imagine, but you really only need one good pan and this is it.

Wednesday, August 4, 2010

Inspiration, I need some

There's writer's block and painter's block and sometimes I get cook's block. Do you ever think you are in a cooking slump and just can't think of anything to put on the table except mac and cheese, again? There have been days when I thought I could just put a glass of wine and a couple of crackers in front of the kiddos and say "dinner is on". Ok, just kidding, I realize this is not the way it's done, so what to do?

Most days I center meals around one particular food or dish. Sometimes it's a vegetable or a salad or maybe a meat. For instance, the other day I had tacos on the brain. Now I didn't want regular every day tacos and it's really HOT in Kentucky right now so I didn't want a lot of heat in the kitchen. I found some shrimp in the freezer and had some cucumbers and other veggies. So I spicy seasoned the shrimp and roasted them quickly under the broiler, tossed them with cucumber, carrot and red onion and mixed up a light dressing of Greek Yogurt (better than sour cream) with a squeeze of lime juice. Then I looked around and realized I didn't have any tortillas for tacos, but I did have some pita pockets. Hey, it's just cooking, doesn't a pita pocket look like a taco shell? Add some leafy lettuce and fresh tomato and dinner is on. Now this is not at all what I envisioned but it turned out just fine.


So here's where embellishing really took over. You can be inspired by what you have around you, don't be afraid to change your mind. But sometimes mac and cheese is still a good thing.

Tuesday, July 27, 2010

Summer Pasta

Today I had pasta on the brain. We have so many luscious tomatoes I thought we needed a fresh sauce over a hearty pasta. One thing lead to another and suddenly I found myself peppered with flour and making fettuccine.

In the past when making pasta I used a rolling pin and a knife to flatten and cut the noodles. But wait, they make a special gizmo that should make the job easier and I just happen to have a gift card to a cooking store. So I now have this new toy.


I won't say it was smooth sailing but I was able to turn out some fine pasta with just a slight snafu. Ok, I really didn't pay attention and when the noodles were cut some stuck together but I made a nice recovery. (With some expert help from my Galley Slave). Here's what they looked like before cooking.


So then I made a very simple sauce of pancetta, fresh tomatoes, onions, garlic, yellow squash and basil. You can embellish a fresh sauce with any type vegetable or meat you can imagine. I blanched about 4 large tomatoes (about 2 1/2 pounds) to remove the skins, then crushed them by hand. I sauteed about 1 cup of diced onion in 2 TBLSP olive oil and 1 TBLSP butter until it was golden in color, then added 2 garlic cloves minced. Then I added 2 slices of pancetta that were 1/4 inch thick cut into 1/4 inch slices and let them sizzle for a couple of minutes. Add the tomatoes and salt and pepper to taste. Let this mixture simmer until the tomatoes have absorbed all the oil, about 20 minutes. Then I added my veggies and just let them cook until slightly wilted. And here's dinner.


If using fresh tomatoes try to use meaty ones, romas are best if available. If you don't have fresh tomatoes use a large can of plum tomatoes, just crush them before adding to the onion mixture. You can leave out pancetta, I just had some and thought it would be a great flavor for the mix. Eggplant and zucchini are great veggies to add. This is a "loose" recipe, but can be made quickly and it's oh so good. And of course you don't have to make pasta, I just got a crazy urge.


Wednesday, July 21, 2010

The Maiden Voyage


Cooking blogs are a dime a dozen you say. This is true so I am going to toss another version into the ring.


Recipes can be found everywhere today. They are all over the information highway, in every periodical, on the backs of canned goods and so on. I like to think of a recipe as a guideline or a starting point. I want to encourage you not to dismiss a recipe because it has ingredients you might not like or maybe doesn't have some things you do like. It's only cooking.


I am by no means a professional. I simply enjoy food and cooking and have used recipes from everywhere. I have found short cuts and substitutions which I think make life just a little bit easier and dinner just a little bit tastier. Here I will be sharing some recipes I've come up with along with their "embellishasyouwish" ideas.


Summer. I love when the garden is full of vegetables. If you don't have a garden there are Farmer's Markets everywhere these days. I think food is better when it's local. What do I crave every summer? Dill pickles. Crazy, but when they are fresh they are yummy. I have tried dill pickles over the years in about a zillion ways. Finally I have come up with a great refrigerator version you can make in a short time and eat in 48 hours (although I never make it past 24 hours before I break into a jar). This recipe makes 4 quarts and trust me, they won't last long.


Check back often, you never know what might show up here. Enjoy.
Refrigerator Dill Pickles

This makes approximately 4 quarts. You could halve it but trust me they go fast
10-12 pickling cucumbers, cut lengthwise into 4-6 spears or slices approximately ¼” thick
1 cup (or so) fresh dill
1 large onion cut into thin slices
8 cloves of garlic thinly sliced
Jalapeno or Serrano peppers
Dried, whole red chiles, the long kind (Chiles de Arbol)
Peppercorns
4 cups water
4 cups white vinegar
¾ cup sugar
1/3 cup + 1 TBLSP Canning salt (you can use Kosher Salt but will need to use a scant ½ cup)
1 Tablespoon whole mustard seed

Bring the water, vinegar, sugar, salt and mustard seed to a boil, cooking just until the salt and sugar have dissolved. Remove from heat.

Into each jar put cucumbers, onions, 2 garlic cloves, ¼ cup dill tightly packed (this is about 4 good sprigs), jalapeno or serrano pepper to taste, 2 dried chiles, 1 tsp. peppercorns. Pack the jars reasonably tight, you should be able to jiggle the contents slightly.

Pour the vinegar mixture into each jar covering all the contents (about 2 cups per jar) making sure you get a few of the mustard seeds in each jar. Put on the lids and place in the refrigerator. They are ready after 24 hours (you know it’s hard to wait) but are best after 48 hours. They will keep in the fridge up to 2 months (like that will happen). The longer they sit the more the flavors are absorbed, and if you used hot peppers they tend to pick up a bit more heat.

Embellish As You Wish
You can really embellish your heart out here. I always like to add lots of onion, in fact I pickled an entire pint jar of onions, but it is strictly up to you. I do suggest you put some in each jar as they do add flavor. Garlic can be tricky, I’ve experimented and found that 2 cloves makes you smell just right, of course you might need a second opinion. When I use jalapeno or Serrano peppers, I usually put about ½ - ¾ of a pepper in each jar sliced along with the seeds. The Serrano peppers are a bit hotter than the jalapenos, usually. Depending on the type of pepper you use, it can get toasty, so you’ll have to be the judge on quantity, or just put peppers in one of your jars to see what you like. The whole dried chiles don’t really add any heat to the mixture, but they do add color and look pretty in the jar. If you don’t have peppercorns don’t worry about it, it adds a little flavor but it’s mostly for looks in the jar.
All of these ingredients can be found in any grocery, no specialties here. Canning salt is easily found and has a higher sodium content than Kosher salt. I’ve used Kosher salt and it works just fine. The main thing is DO NOT use table salt, it won’t work, trust me.

These pickles are not processed and they stay crispy in the refrigerator. They are best with fresh pickling cucumbers in the summer, but I’ve made them with English cucumbers in the winter. If you are making slices this is a chance to use that Pampered Chef crinkle cutter thing you aren’t sure why you bought. One other note, since these are not processed you can use any glass jar, it doesn’t need to be a canning jar, so if you’ve saved old mayonnaise or pickle jars that’s fine. You can also make one big batch in a gallon jar, it’s just a little tricky on the serving. I found some great plastic lids at Kroger with the canning supplies. They come 6 to a box and are in the wide and narrow mouth sizes. This makes using your jars a whole lot easier.